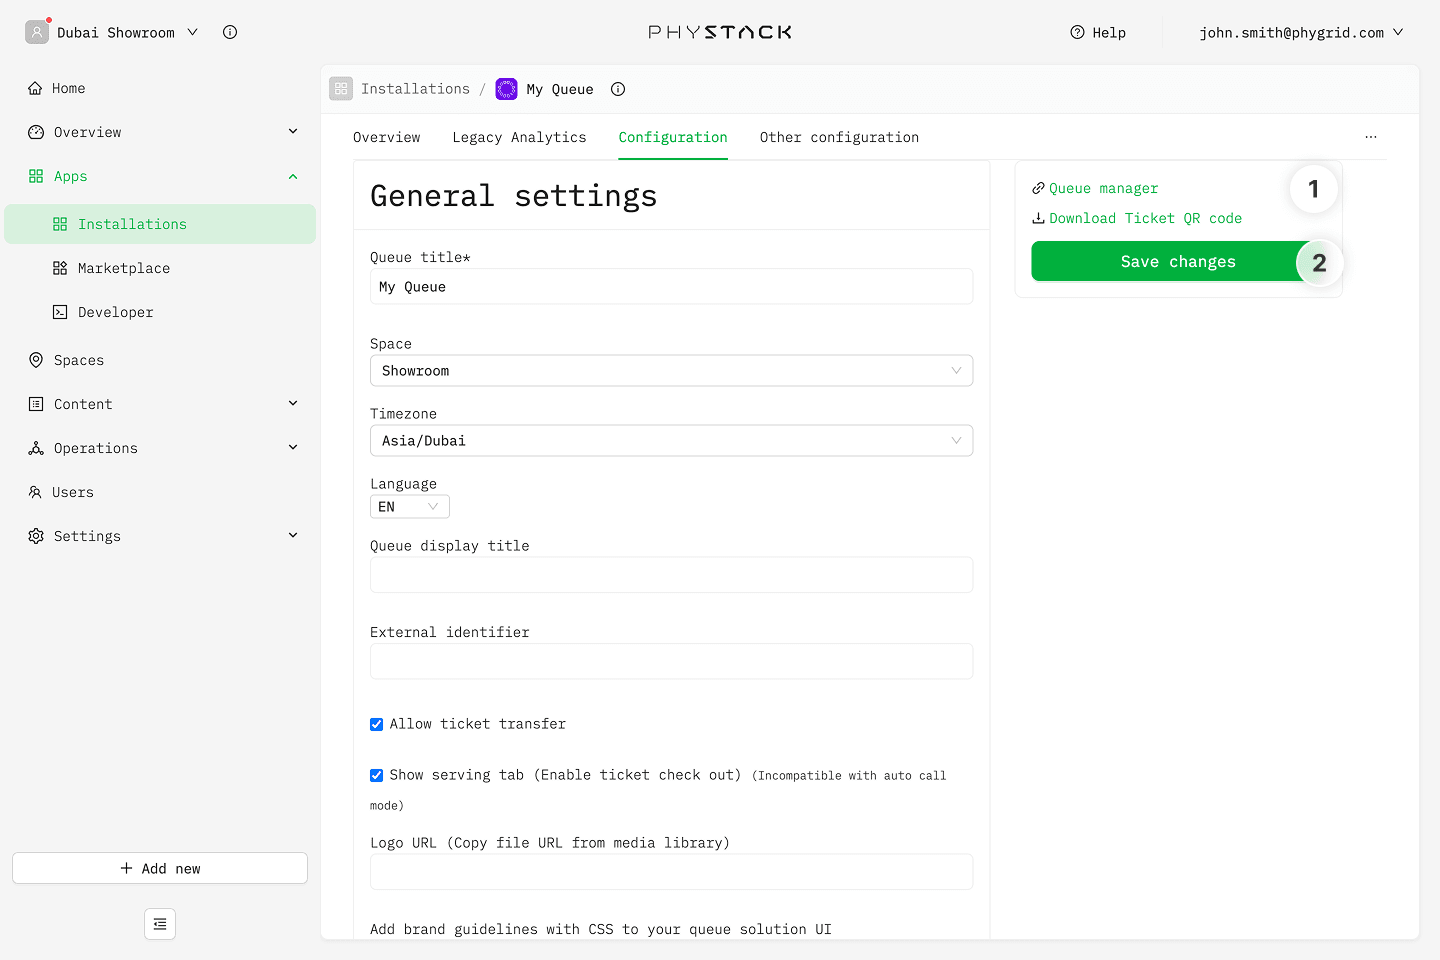
General settings
- Queue title: The internal name of the queue, used to identify it across Console
- Space: Assign the queue to a specific space within your organization
- Timezone: Set the timezone for the queue. This affects opening hours, booking slots, and all time-related settings
- Queue language: Select the primary language for customer-facing text customization. Supports English, Arabic, Swedish, German, Spanish, Italian, Icelandic, Japanese, Dutch, Norwegian, French, Danish, and Urdu
- Queue display title: A localized customer-facing name for the queue, shown in the selected language
- External identifier: An optional external ID that can be used to map this queue to an external system
- Allow ticket transfer: If selected, staff can transfer tickets between queues within the same organization, and between categories and staff in the same queue
- Show serving tab: Enables serving and checkout option. This option is not available when auto call is enabled
- Logo URL: URL to a custom logo image that will be displayed in customer-facing queue interfaces
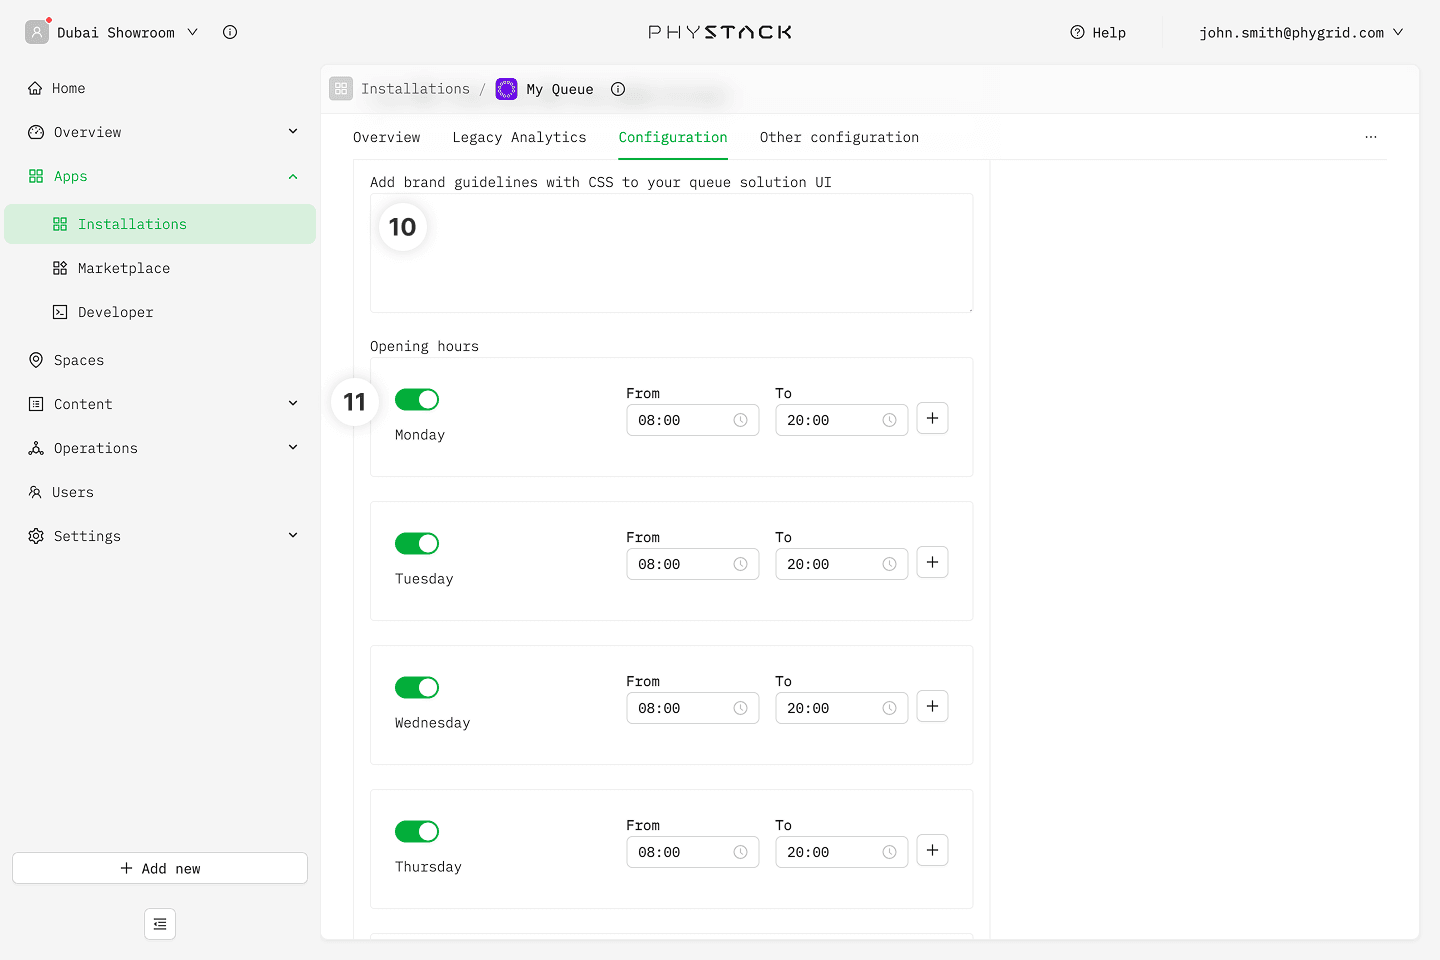
- Global styles: Custom CSS that will be applied to customer-facing queue interfaces for visual customization
- Opening hours: Set the regular weekly opening hours for the queue. You can define different hours for each day of the week, with multiple time periods per day
- Auto reset queue: Set one or more times of day at which the queue will automatically reset, clearing occupancy and closing all open tickets
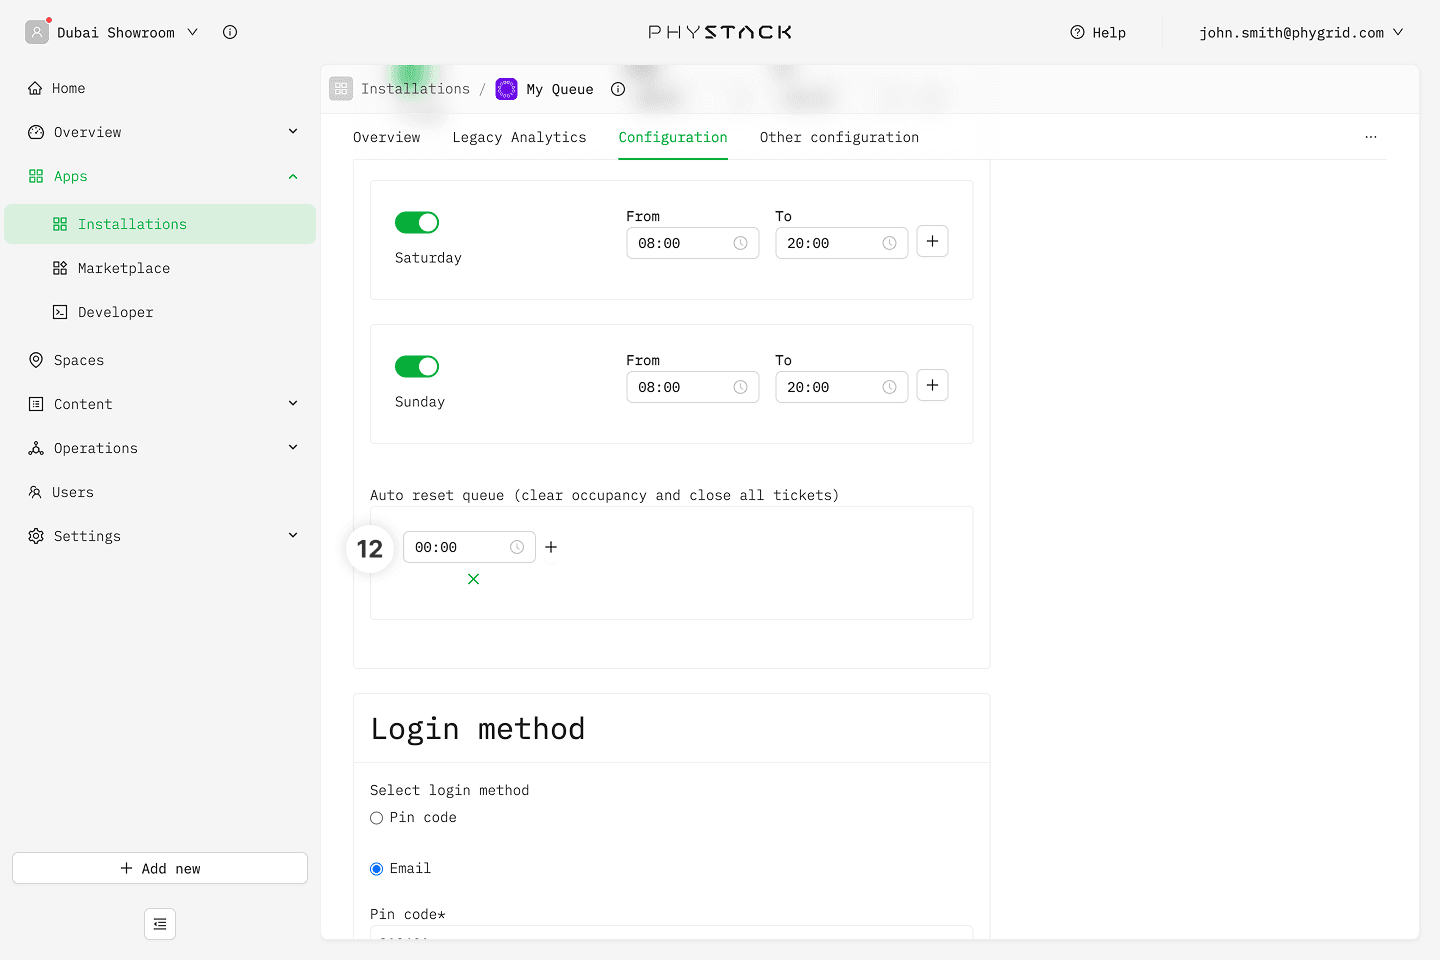
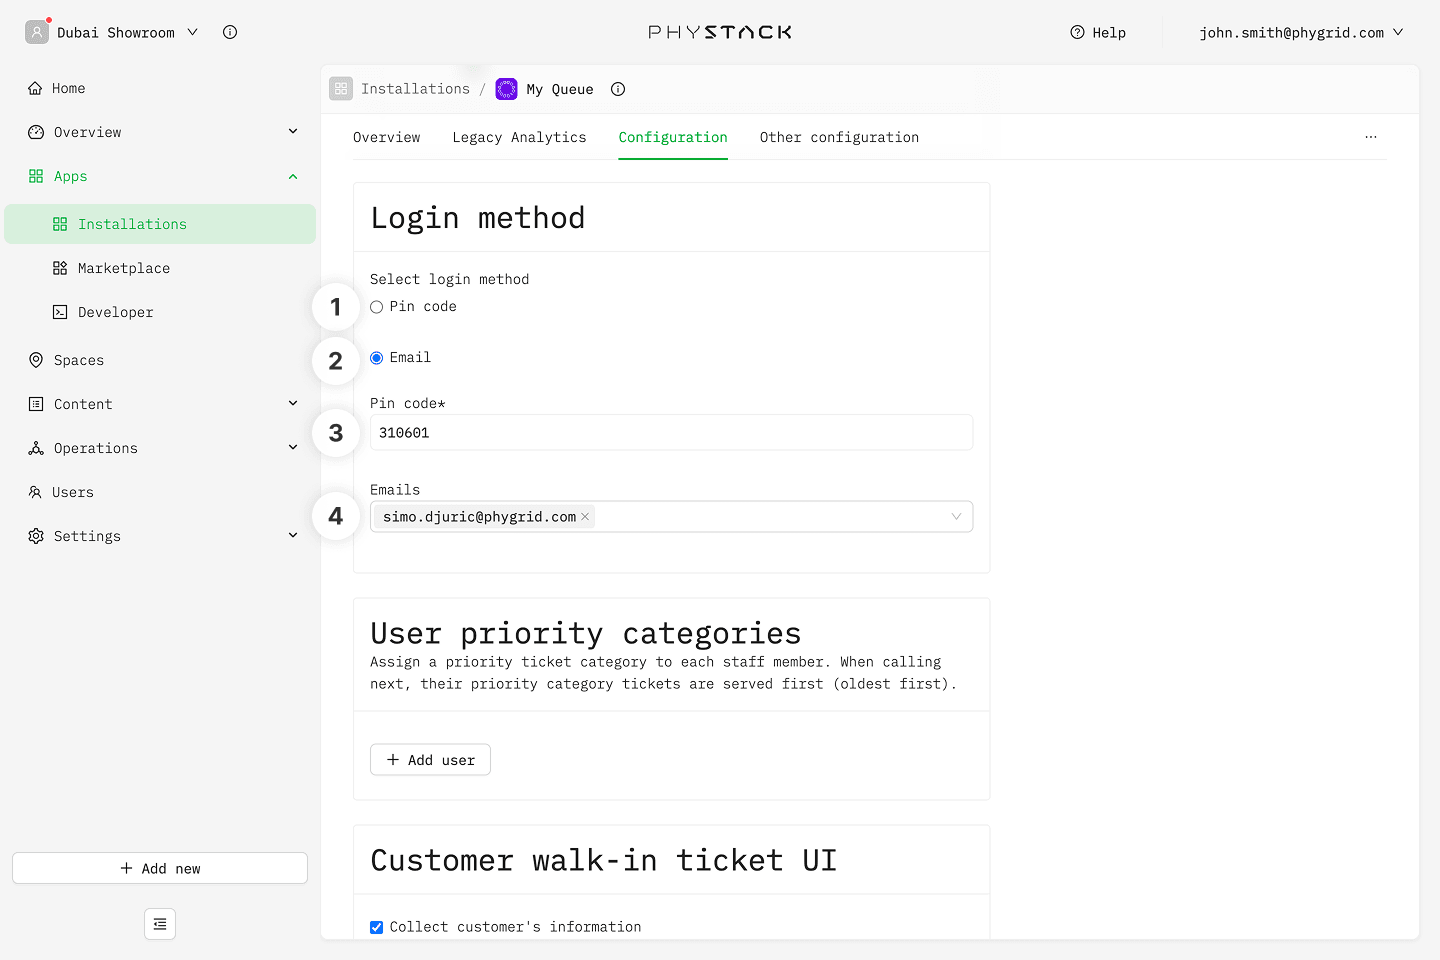
Login method
- Pin code login: Staff log in to the Queue Manager app using a shared PIN code
- Email login: Staff log in to the Queue Manager app using their individual email address. This enables per-user tracking and is required for user priority assignments
- Pin code: The PIN code that staff will use to access the Queue Manager app
- Allowed emails: When email login is selected, define which user email addresses are permitted to log in to the Queue Manager app. Users need to be added to the tenant to be shown in this list.
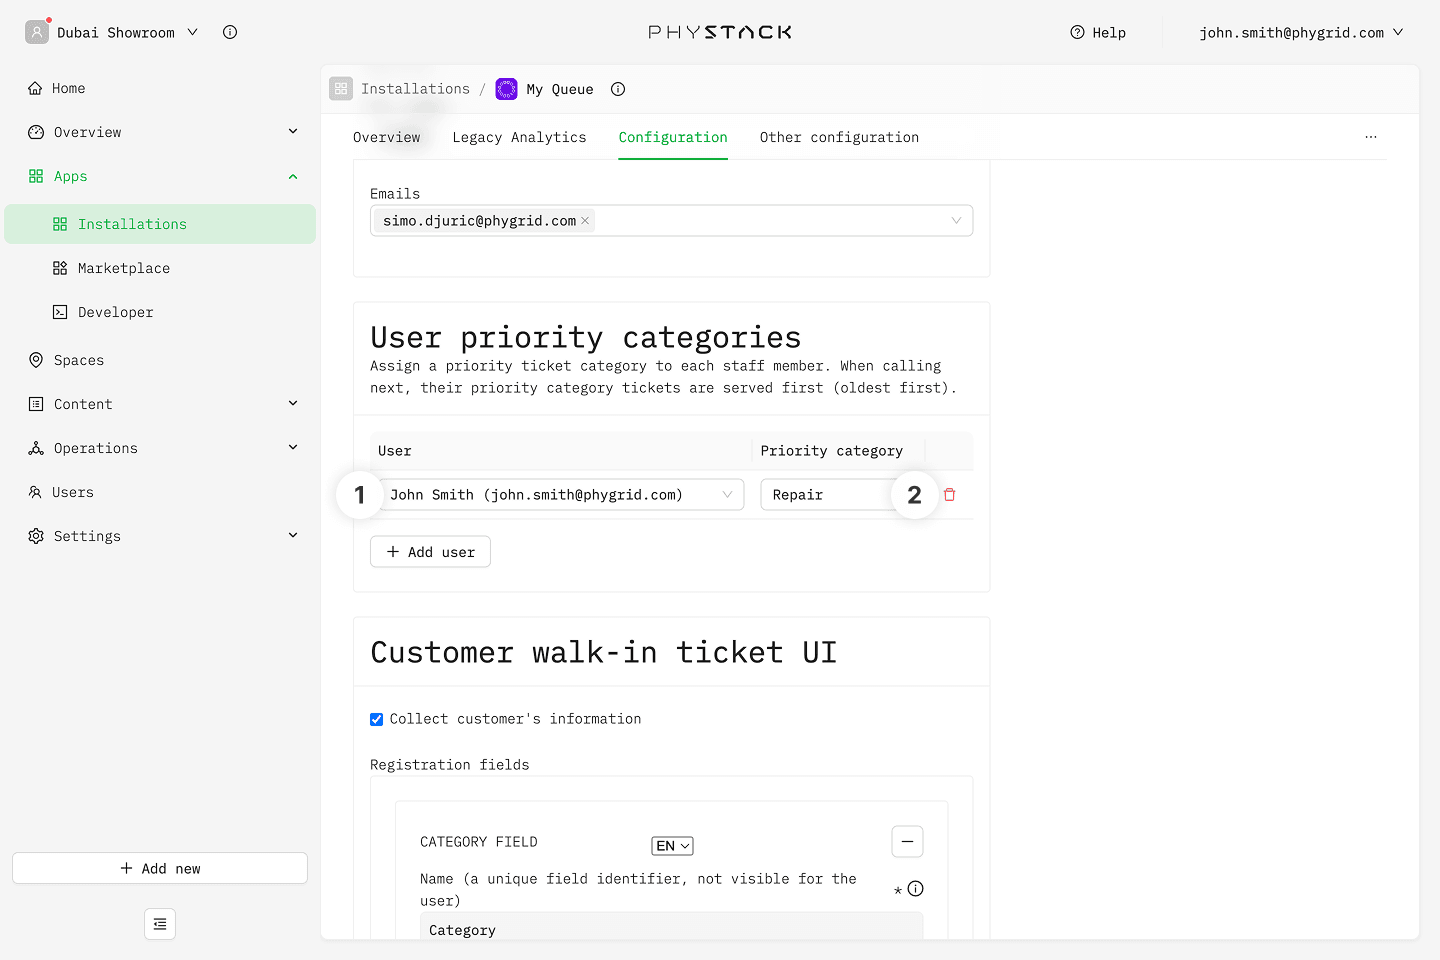
User priority assignments
This section is only visible when in-store mode and email login are both enabled, at least one allowed email is set, and at least one category exists
- User: Select a staff member from the list of allowed emails
- Category: Assign a service category to that staff member, so tickets in that category will be routed to them with priority
Walk-in settings
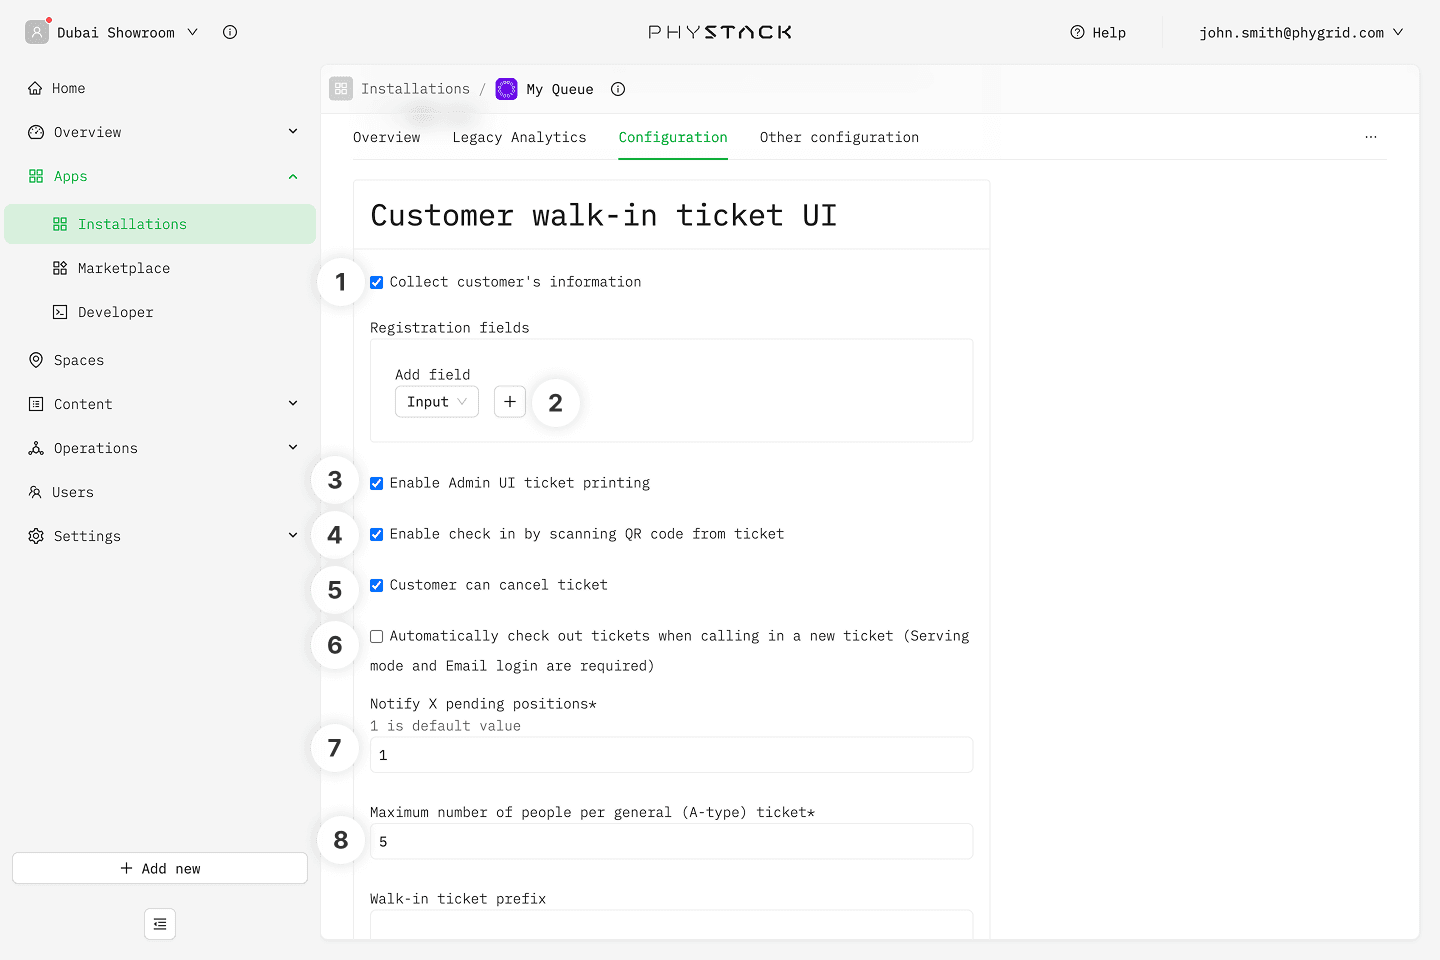
- Enable registration: If selected, customers will be asked to fill in a registration form when joining the queue. When enabled, a registration field builder appears where you can configure the form fields
- Registration field builder: Define the fields that customers fill in when joining the queue. Supported field types include text input, text area, checkbox, radio buttons, phone, email, and category selector. Each field can be required, localized, and configured with validation rules
- Enable admin UI ticket printing: If selected, staff can manually print tickets from the Queue Manager app
- Enable check-in by scanning QR code from ticket: If selected, customers can check in to the queue by having a QR code displayed on the ticket that the staff can scan using Queue Manager
- Customer can cancel ticket: If selected, walk-in customers can cancel their own ticket from the ticket status page
- Automatically check out tickets: If selected, the previous customer is automatically checked out when the next customer is called. This option is only available when both in-store mode and email login are enabled
- Notify X pending positions: Set the number of positions ahead at which customers receive a heads-up notification (amber ticket state) before being called
- Maximum number of people per general (A-type) ticket: Set the maximum number of people that can be registered on a single walk-in ticket
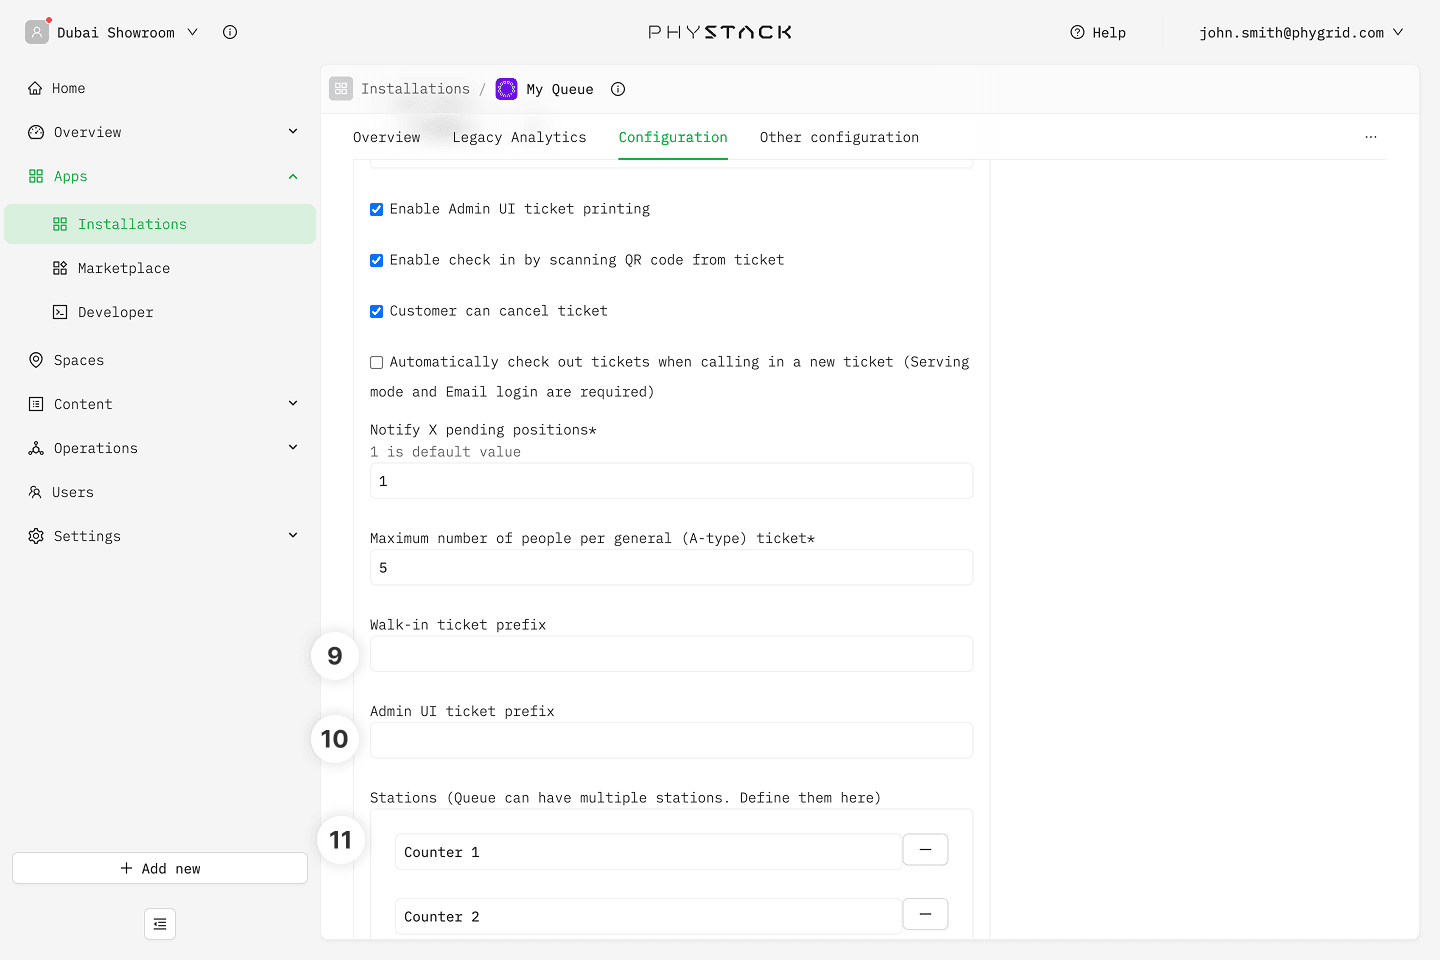
- Walk-in ticket prefix: A prefix (up to 3 characters) added to walk-in ticket numbers for identification on displays and printed tickets
- Manual ticket prefix: A prefix (up to 3 characters) added to manually created ticket numbers
- Stations: Define the service counters or stations available in the queue. Staff will be assigned to a station when serving customers
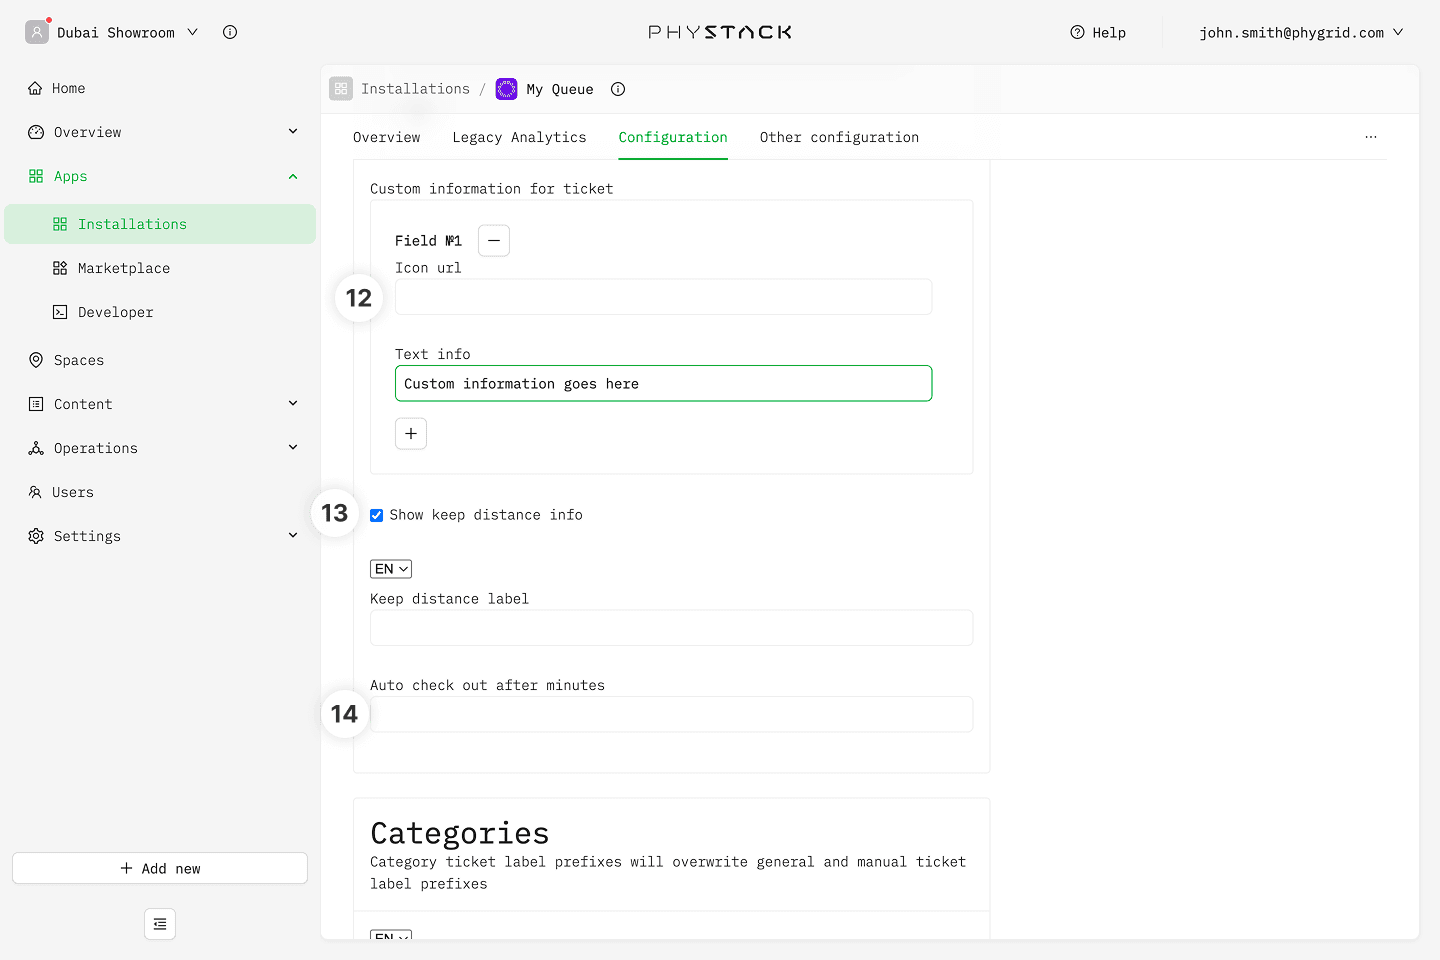
- Custom information for ticket: Add custom information fields that will be attached to each queue ticket. These can be used to capture additional data for reporting
- Enable keep distance info: If selected, a keep-distance message is displayed to customers. When enabled, you can customize the message text per language
- Auto check out after minutes: Set the number of minutes after which a customer is automatically checked out if they haven't been served
Categories
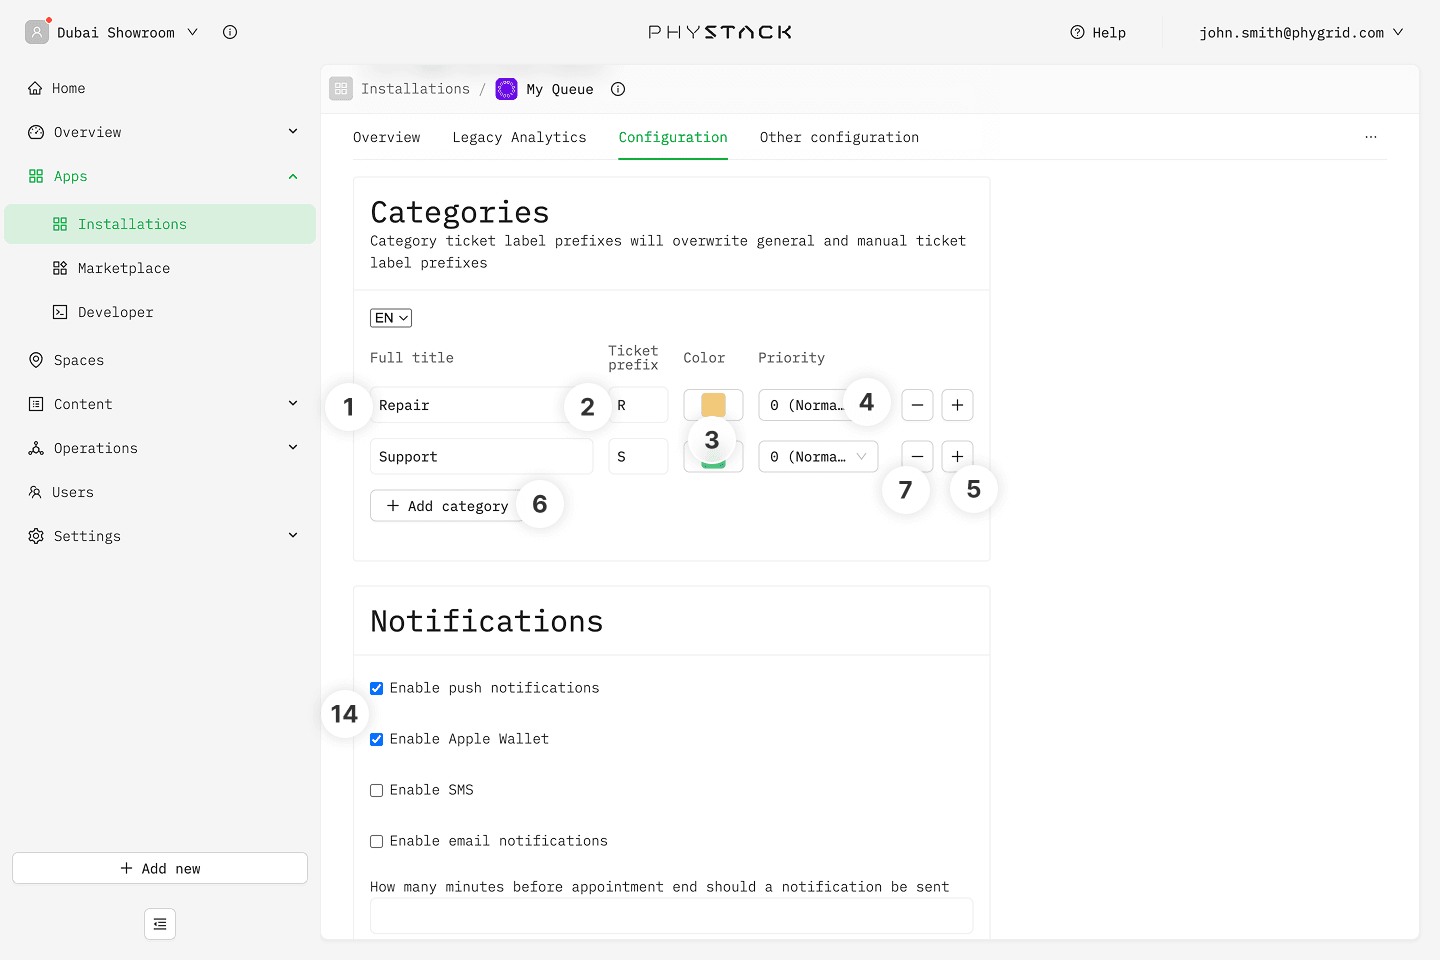
- Category name: The localized display name for the service category, shown to customers when they select a service type
- Label prefix: A short prefix added to ticket numbers for this category, making it easy to identify the service type on displays and printed tickets
- Color: A color assigned to the category for visual identification in the Queue Manager app and signage
- Priority: Set the priority level for this category from 0 (normal) to 10 (highest). Higher priority tickets will be served before lower priority ones
- Add subcategory: Create a subcategory under a parent category for more granular service type selection
- Add category: Create a new top-level service category
- Remove category: Remove a category that has no subcategories
Notifications
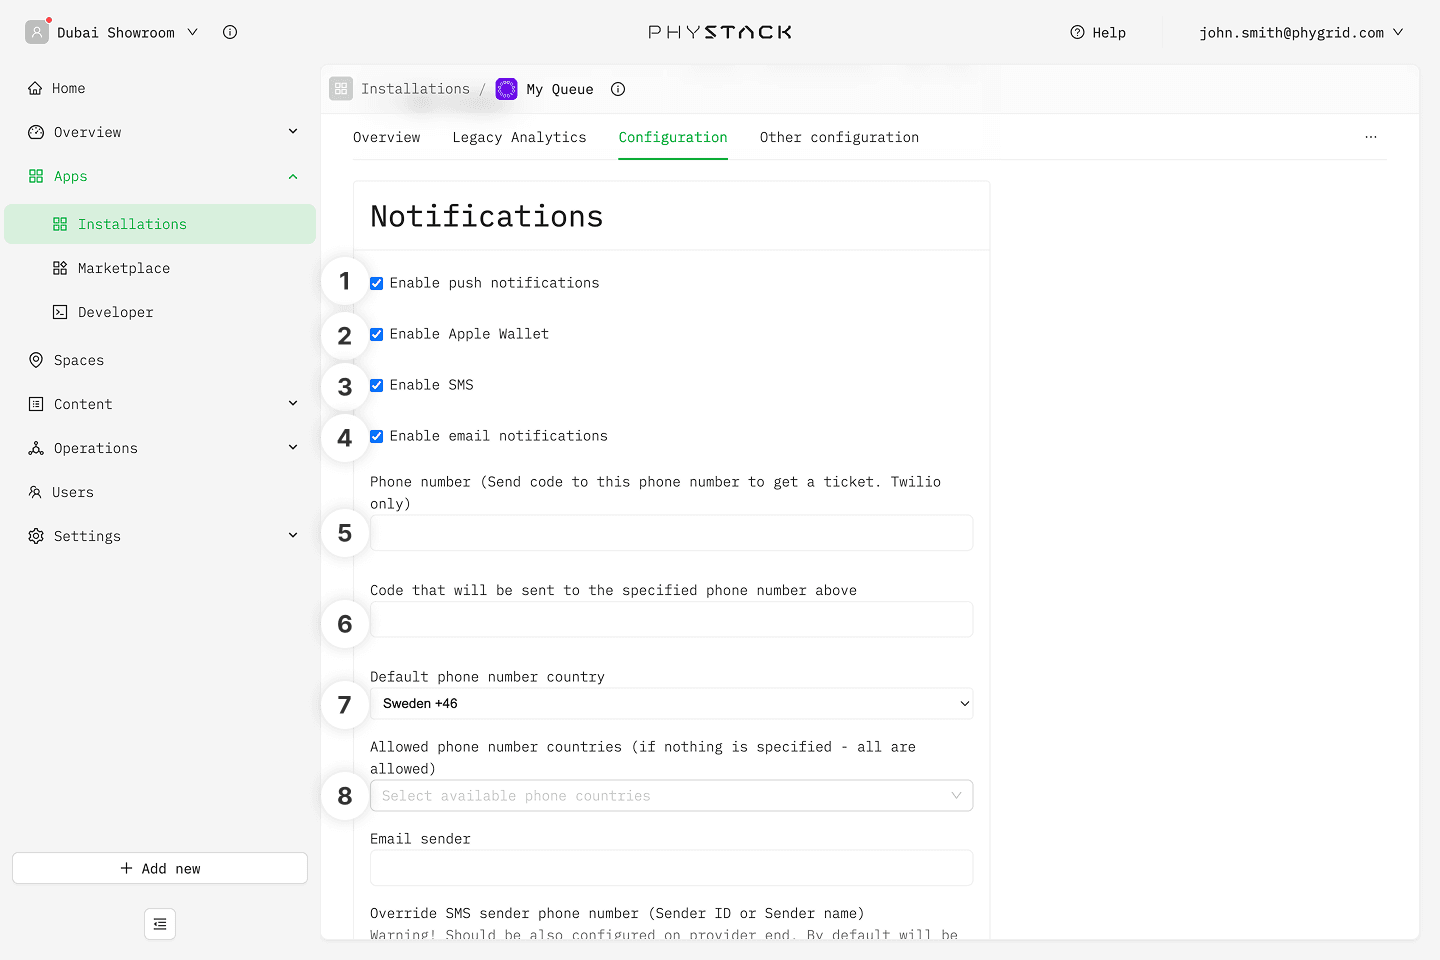
- Enable web push notifications: If selected, customers receive browser push notifications for queue updates such as being called to a counter
- Enable Apple Wallet: If selected, customers can add their queue ticket to Apple Wallet for quick access and lock-screen notifications
- Enable SMS: If selected, customers receive SMS notifications for queue updates. Enabling this reveals additional phone number configuration options
- Enable email notifications: If selected, customers receive email notifications for queue updates. Enabling this reveals the email sender configuration
- Phone number: Twilio only option that allows the visitors to join the queue by sending an SMS to the specified number
- Code: A short code used to create the ticket using SMS
- Default phone number country: The default country code pre-selected when customers enter their phone number
- Allowed countries: Restrict which countries are available in the phone number country selector
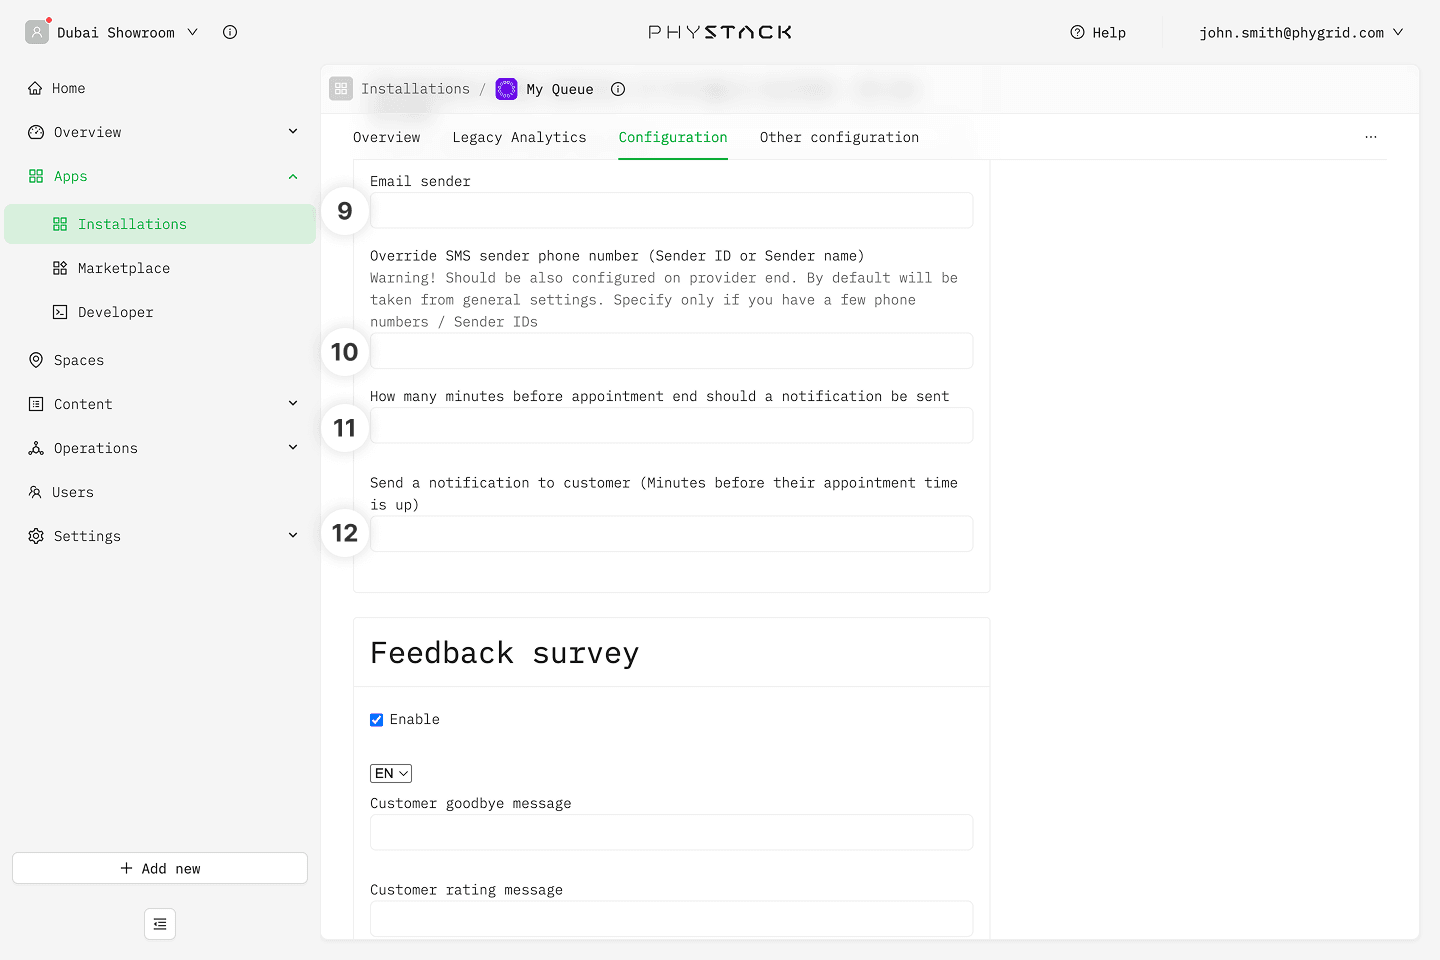
- Email sender: The email address used as the sender for email notifications
- Override SMS sender phone number: The phone number used to send SMS messages. If left empty, a default system number is used
- Leave after minutes: The number of minutes after being served that a customer is allowed to stay. When this time is up, their ticket is automatically cancelled and they receive a "time to leave" notification
- Leave reminder notification after minutes: The number of minutes after being served at which a reminder is sent to the customer, warning them that their remaining time is almost up
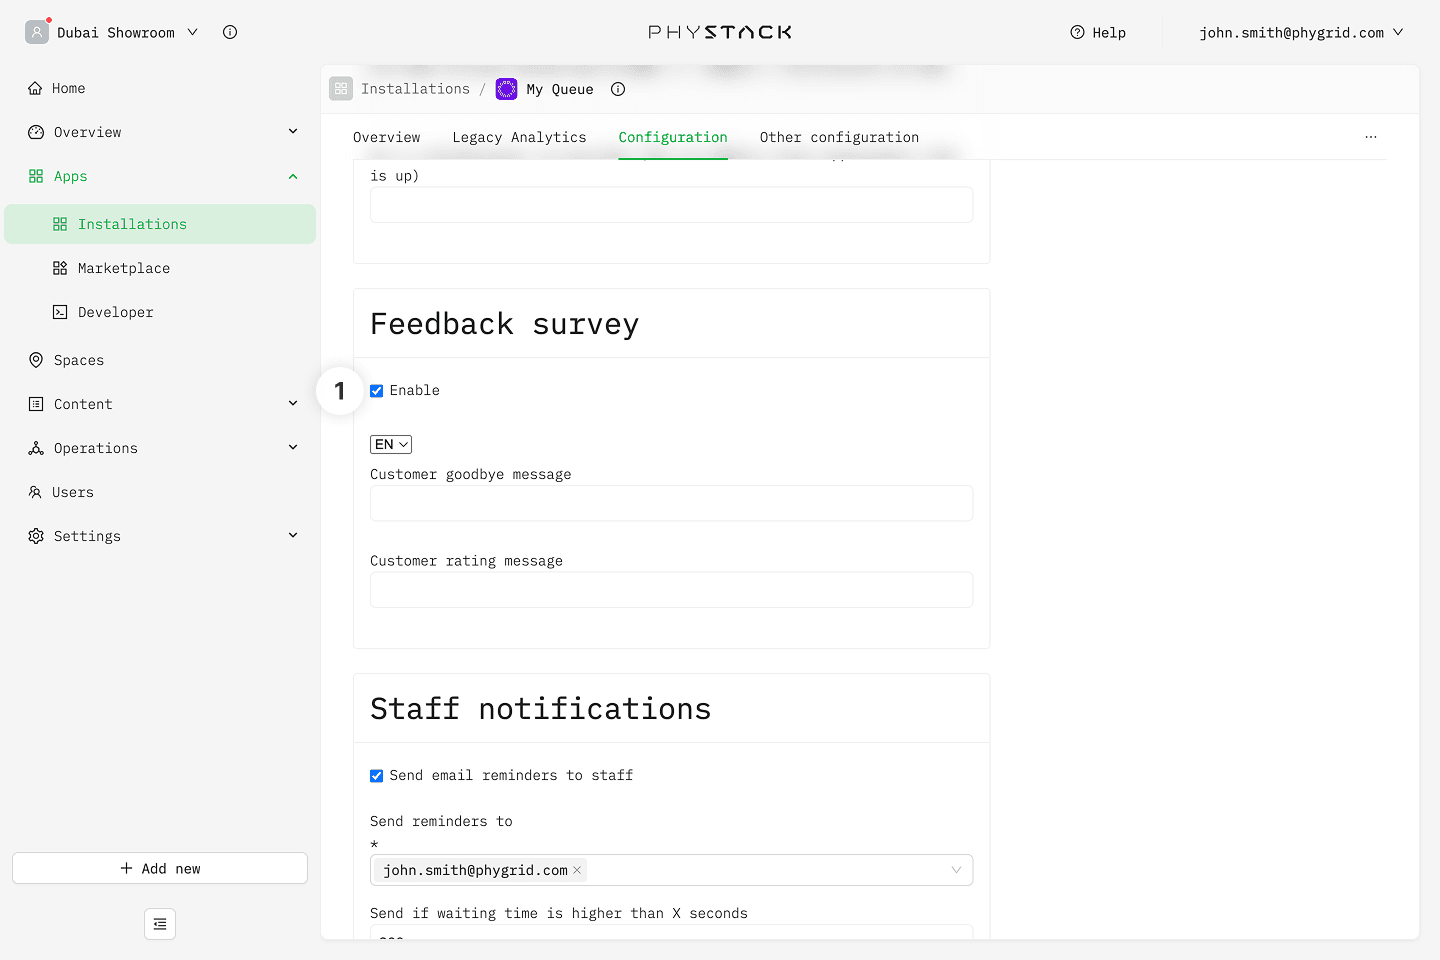
Feedback survey
- Enable feedback survey: If selected, customers will be presented with a feedback survey after their visit is completed. When enabled, you can customize the survey text per language
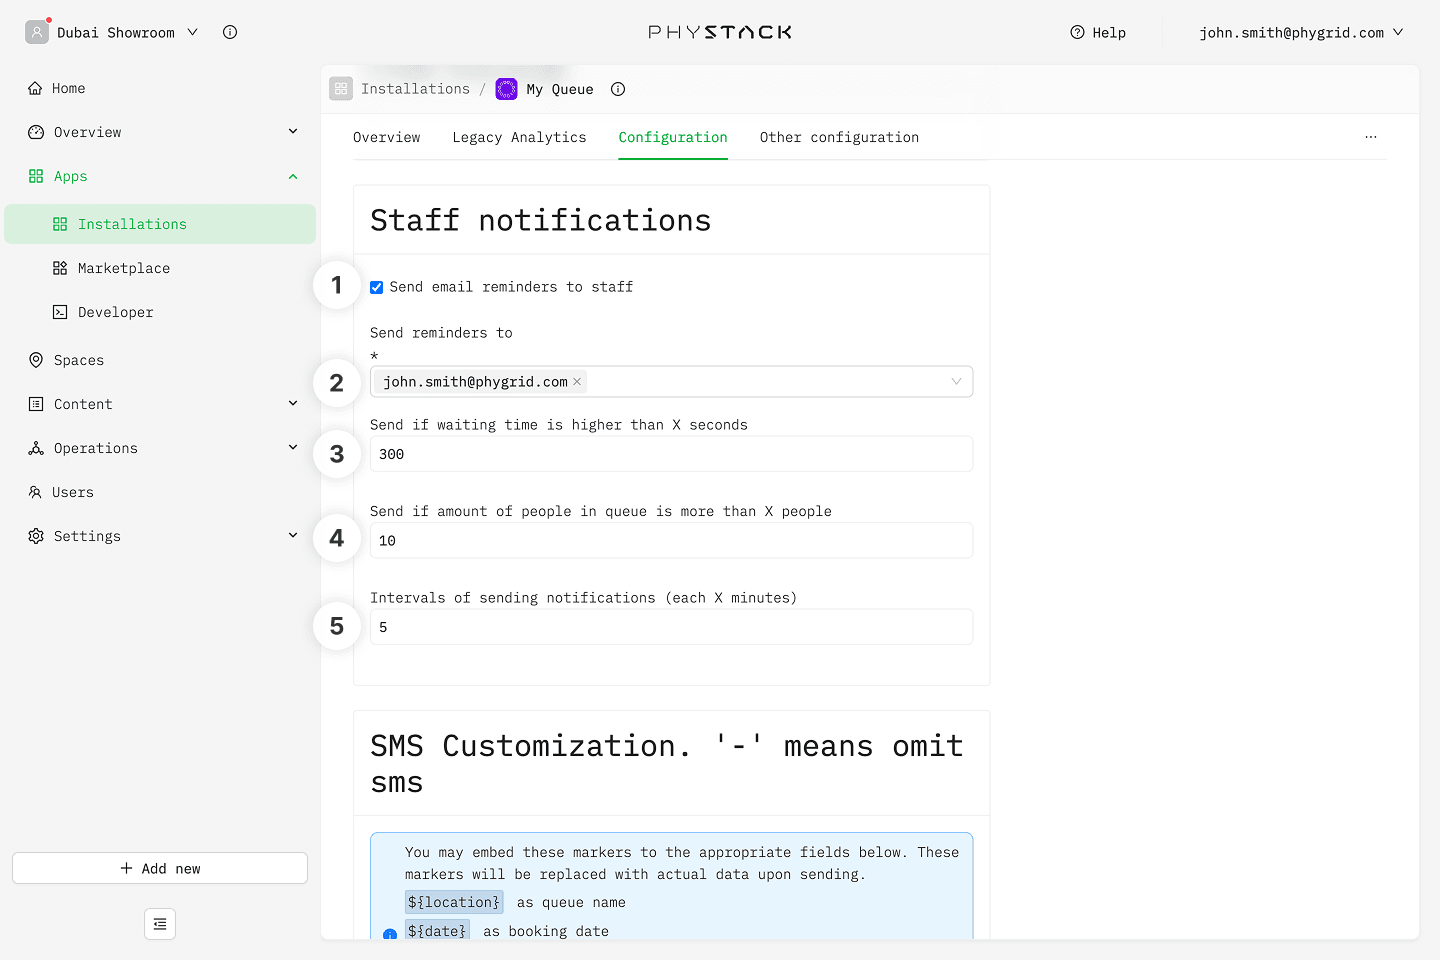
Staff notifications
- Enable staff notifications: If selected, designated staff members receive email alerts when queue conditions exceed defined thresholds
- Email list: Select which staff members should receive the notification emails
- Threshold waiting time: Send a notification when any customer has been waiting longer than this number of minutes
- Threshold people count: Send a notification when the number of people in the queue exceeds this value
- Send interval: The minimum number of minutes between consecutive staff notification emails to prevent alert fatigue
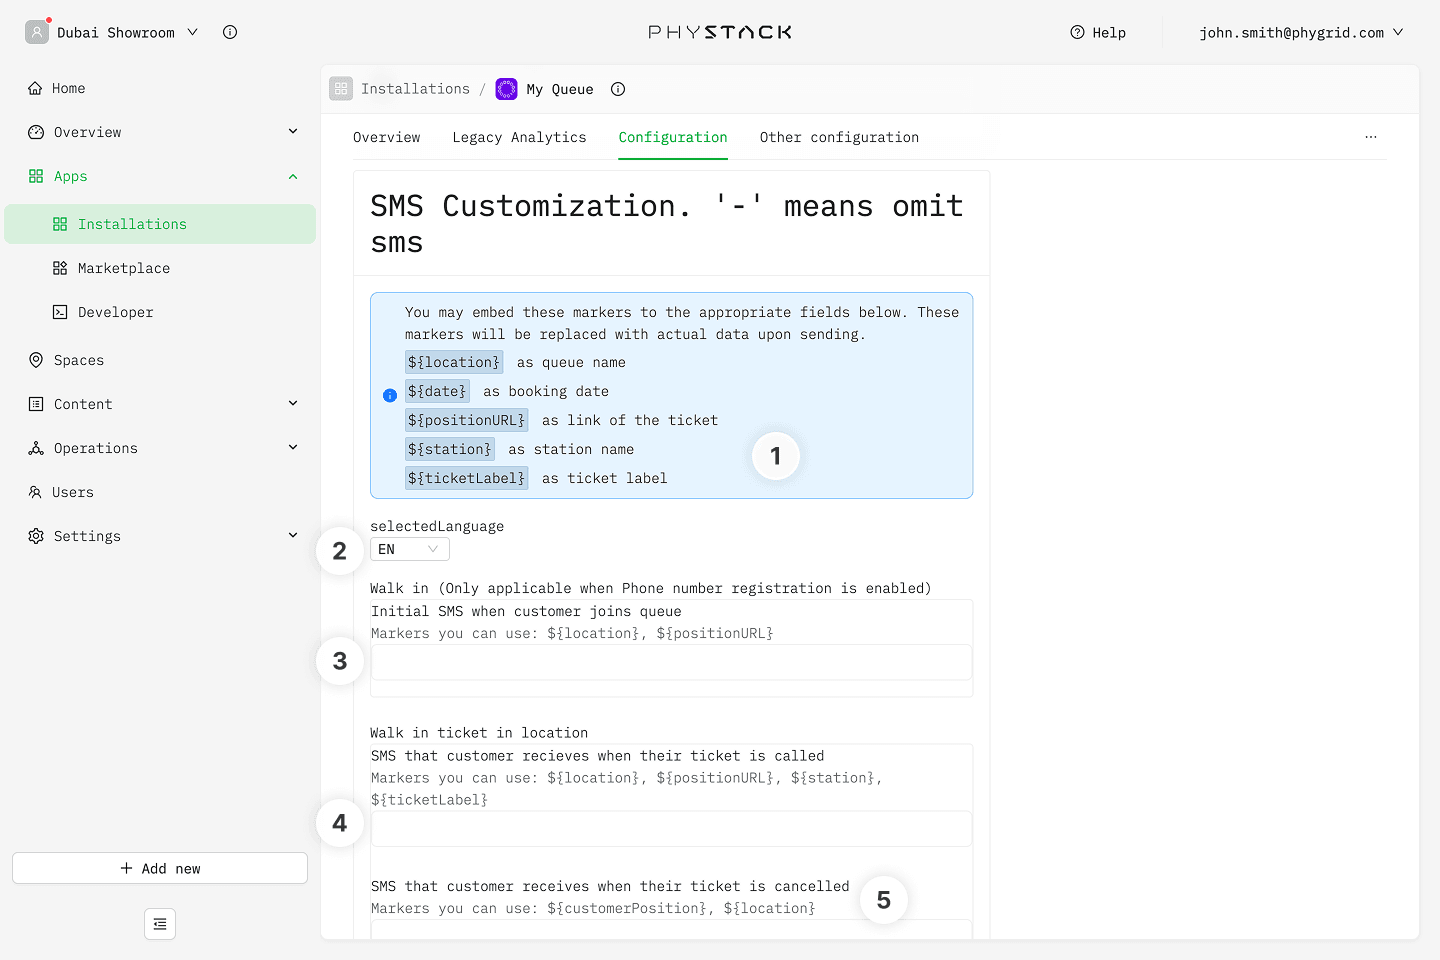
SMS customization
Text customization supports template markers that dynamically insert queue data into your messages
- SMS template markers: Use
${location}for the queue location,${date}for the current date,${positionURL}for a link to the ticket status page,${station}for the assigned station name, and${ticketLabel}for the ticket number - Selected language: Choose the language you want to customize text for. All text fields below will update to show the content for the selected language
- Walk-in: Customize the SMS message that is sent when a visitor joins the queue
- Walk-in ticket in location: Customize the SMS messages that is sent when a ticket is called
- Cancelled: Customize the SMS message that is sent when a ticket is canceled
Save
- Queue details sidebar: Displays read-only information about the queue including its ID, links, and QR codes
- Save button: Save all changes to the queue configuration. The button is only enabled when there are unsaved changes